The last episode of our Bang for Buck article saw the motor finalised for long term use and in particular a change of piston and a long stroke crank added, up from standard 58/107mm rod to 60/110mm, with confirmation of results. But it is important to know that more than just a cubic capacity change is happening here…
Upgrades
To try and keep the engine reliable at this new found power level, a decision was made early on to swap out items that on occasion experience has shown to fail. With the motor removed and on the bench a full strip, inspection and rebuild was done. The gearbox end of the motor had proven fine with good gear selection, the gear arm was shimmed well and the gearbox shimming was good also. The wheel had no excess movement, indicating the rear hub end bearing was good. The gear cluster bush was removed though and the alloy shaving of swarf, which occurs on fitting at the factory, was also removed.
Enjoy more Scootering Magazine reading every month.
Click here to subscribe & save.
The case was dressed off at the bottom to ensure its replacement didn’t repeat the process, a new bush was fitted with a new needle roller, end-plate studs and dowels were removed and Loctited in and set to the correct height flush with the nuts to stop the chain catching. The wishbone was checked and deburred and its bolt head checked for good clearance on the case before refitting with a drop of Loctite.
The layshaft was removed to check the O-ring was fitted and okay and a deburr and clean-up of the edges of both the layshaft and sliding gear selector was carried out. The gears selected nicely with a positive action which was precise yet light, so this was left alone on the standard selector spring. An upgrade to a stiffer spring is done at this stage if it shows any risk of jumping out of gear. The end plate was refitted with new nuts and spring washers, also with a drop of Loctite.
The clutch received a deburr of its components and was swapped out for a five-plate item which has proven to be good up to 25bhp when used with the right springs. The chain had already stretched and become loose and would continue to need adjustment so was swapped for an IWIS 81 link item, and a 19 tooth sprocket, giving the gearing increase which is advisable on the SIL GP 200 gearbox, providing a more relaxed cruising top speed. The SIL front sprocket bolt that has the separate washer often ‘dishes in’ so was swapped for a remade one-piece item.
The original pressed steel chain guides were also replaced with a pull-down tensioner. The crankshaft at 60 stroke with 110 rod requires either the case machining in places or sometimes all the way round to clear the back of the con rod, or the con rod machining down to sit near to flush with the crank webs. This has to be done with the crank split; ask about this when buying a crank if you don’t want to get involved with doing too much work on the cases.
The crank bearings and seals were replaced with high quality items along with a new oil seal plate and fixings to replace the SIL alloy item which distorts when overtightened. The original steel oil seal plates are best and have been remade by many suppliers but a warning here: they are not all to the same dimensions, so upon assembly great care is required; check the centre hole sits an equal distance left/right from the bearing and try one of each of the four positions it can be fitted to as one is often better than the rest. The next issue is the oil seal plate gasket which, upon fitting the oil seal plate, must compress the gasket.
This can be checked before by measuring the rebate depth down to the bearing face then measuring the oil seal plate spigot and doing a quick calculation. You can find the dimension to be for example 0.4mm depth, so a 0.5mm gasket will be compressed okay but sometimes it’s around 0.8mm, meaning a 1mm gasket is required. Alternatively, do a dummy build of the plate with a small blob of plasticine or similar to check the gasket is definitely being nipped or check for the gasket leaving the bearing maker’s name embossed into it if you fit the bearing that way up beforehand.
The plate was assembled and the gasket gave a guaranteed petrol resistant sealant around all surfaces where there’s a gap. After seeing many leak-down tests fail in this area, it’s worth the extra effort now rather than rebuild it again later. The mag housing was rebuilt with new bearings and seals and the mag gasket replaced with one of an appropriate thickness to give an even clearance on the crank webs to casing.
One last item that’s really important – we found on our SIL test motor that the short crankcase studs which secure the mag housing were made of cheese so all three were replaced. With the motor built up, the top end was fitted again and more calculations were needed as the crank and rod length change throws up lots of things to reconsider that are not always obvious.
The top end’s previous set-up on the 58/107 crank was as follows: exhaust duration 188°, transfer duration 126°, inlet duration 149° and blowdown 31°.
If you built the motor on the 60/110 and adjusted the base gaskets and packers until the same squish clearance was achieved as before, it would be as follows: exhaust duration 193°, transfer duration 134°, inlet duration 145.5° and blowdown 29.24°. So a straight swap and build to this spec would not be a fair comparison of crank stroking.

Correction
On a 60 stroke, the piston travels an extra 1mm up and extra 1mm down than the 58. If you adjust the cylinder height so that the piston sits 1mm higher than it was previously, then it almost corrects the ex-duration to near what it was before, as it’s near the top of the crank’s swing. But the transfer duration doesn’t follow as close, because they sit lower down the bore and fall onto the larger swing of the crank’s stroke, so have a greater change comparatively. The inlet being nearer the bottom of the stroke again remains close to what it was on the 58 build.
So with the barrel height adjusted and piston sat 1mm higher than previous we get as close to previous figures as possible: exhaust duration 189°, transfer duration 129.5°, inlet duration 149.19° and blowdown 29.75°.
So what other changes occur as a result of stroking?
The previous 58 set-up was 198.43cc and the new 60 set up makes it 205.27cc so we now have a larger cubic capacity. This, along with the mild exhaust port duration change, now alters the compression ratio despite running the same squish clearance. On a 58 stroke it was 10.5-1 uncorrected tdc. and 6.07-1 corrected on a 60 stroke it becomes 10.87-1 uncorrected and 6.23-1 corrected.
With the 60 stroke and 110 rod we also add around 3mm of base packer so this increases the total crankcase volume by around 12cc, the length of the transfer duct is extended by 3mm, and the entry into the transfer feeds from the base of the crankcase will have a larger opening for the charge which resides below the piston crown to travel through.
The longer con rod length sits the piston crown higher in relation to the case so more volume is created below it also. Combined with a different angle it pushes the piston up the bore, changing the thrust applied to the piston faces. So with all these variables it’s difficult to attribute which one has provided any difference in performance, be it for better or worse.
To complete the build a replacement piston was to be used (another change) made by Wossner for AF Rayspeed at 66mm. They produced them for use in Rapido kits with the same crown profile but upon installing I found a surprise that these extra wide transfers on the SIL barrel meant that the bottom ring peg position was not able to be used, so decided to run it on a single ring until a replacement could be sourced (note: AF Rayspeed now has a new batch of 66 pistons with revised peg positions for use on kits that may be tuned with wide transfer ports).
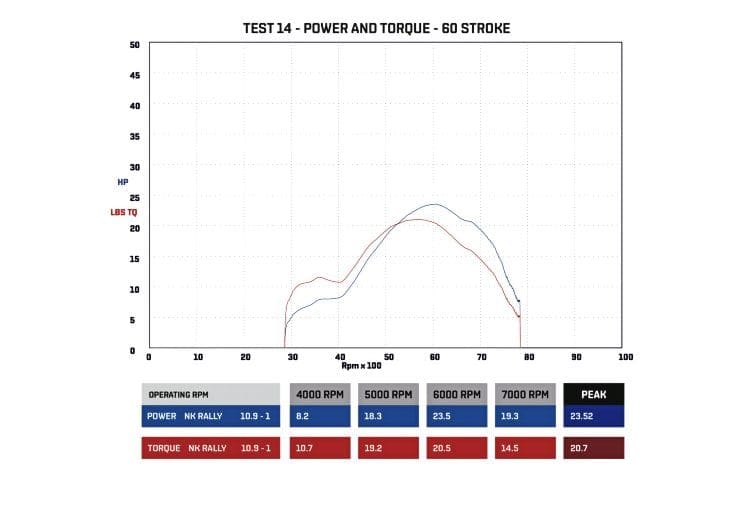
So fully built and leak down tested, back in the chassis it was now time for its last dyno test. As you can see from the graphs, power and torque has gone up slightly and moved the power curve over to the left. This demonstrates an earlier low-down power delivery, but cropping a little at the end of the run again as was seen on the last compression increase.
The result is typical of what I see on the many occasions a change to longer stroke is applied along with the other variables that go hand in hand with this modification. The net effect is a small increase in power, delivered earlier.
That’s all for this month.
Words & Images: Darrell Taylor
This article was taken from the October 2016 edition of Scootering, back issues available here: www.classicmagazines.co.uk/issue/SCO/year/2016