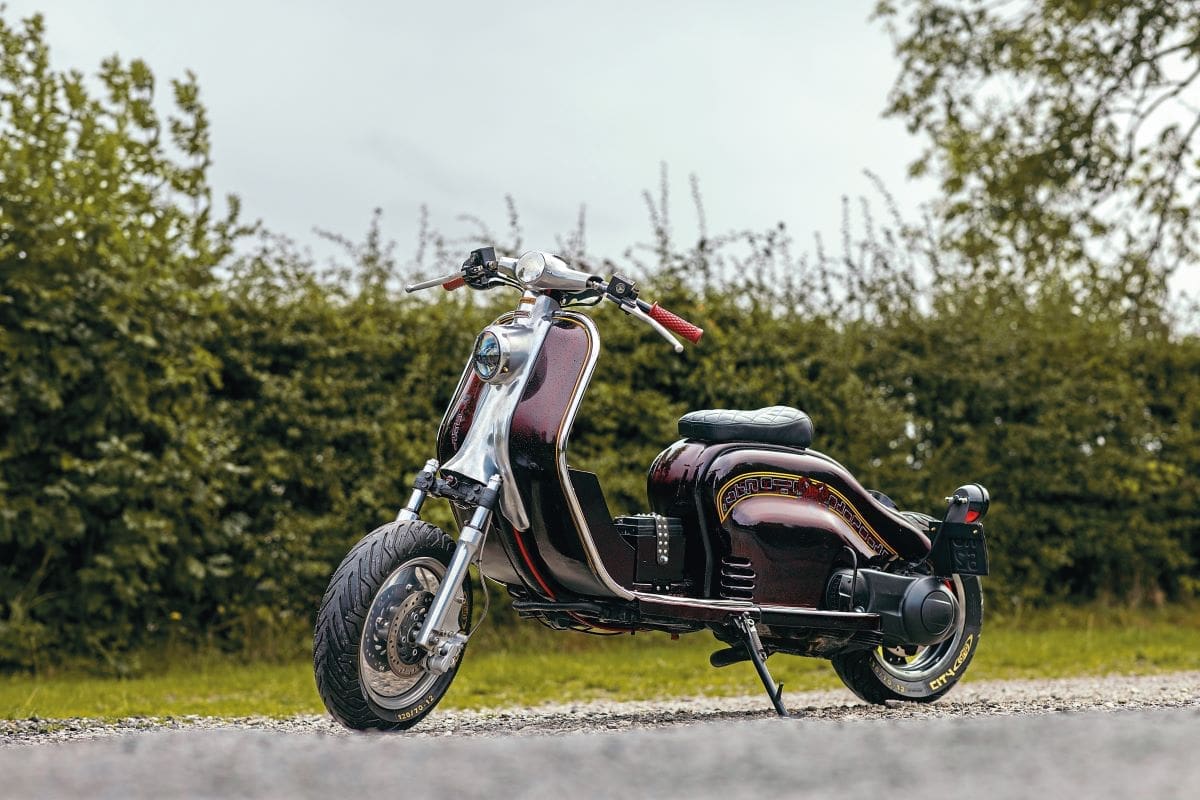
Nik does love a scooter that’s a little out of the ordinary, preferably one that’s had a lot of thought and imagination thrown at it. Richard Lavender’s LD/GTS hybrid hits all the right spots.
Words: Nik Images: Gary Chapman
Although this isn’t the first time I’ve seen this idea executed, I do think that it’s possibly the tidiest finished product that I’ve come across. In nobody’s wildest dreams could it be mistaken for something like a factory prototype; it’s unmistakably the creation of someone who knows how to make one-off machinery that could never be mass produced.
I hope he won’t mind me saying this, but owner Richard Lavender is an interesting character. He has a foot in both custom bike and scooter territory and doesn’t really differentiate between the two. He just likes something different from the norm and has been responsible for a couple of tidy motorbike chops in the past. The problem is that, as he’ll happily admit, while he has a head full of ideas, he can’t actually build things. Luckily for him, he knows a man that can. This scooter was inspired by a similar build from France that he saw photos of at a custom show. That machine was powered by a Honda engine, and only had one major flaw in its design. It couldn’t actually be ridden. As Richard says, what’s the point in that then?
Enjoy more Scootering Magazine reading every month.
Click here to subscribe & save.
Intrigued by the lines, and wanting a road-going version, he set about getting the basics together. A GTS 250 was picked up, and after a while the frame, a 1957 LD150 in case you hadn’t spotted it, was found to go with it. Luckily, the engine went straight in and there were no issues. I didn’t really think you’d believe that!
I’ve spoken to both the owner and the builder while preparing this piece, and they seem to have slightly different versions of the conversation that took place when the topic was brought up. Richard seems to think that the builder, the respected custom motorcycle builder Martin Welsby of Hyde in Manchester, thought it was a challenge worth taking on. Martin, however, remembers it more along the lines of: “No. Definitely no. Are you mad? I don’t know anything about scooters. That’s never going to work. I can’t see how to do it. Go away.” Or words to that effect.

From a different angle
Once the idea was lodged in his head, it niggled away until a possible solution was found. And an unusual solution it was. Anyone who’s built similar engine transplant machines in the past always seems to come at it from a similar angle. Remove the rear of the Lambretta, build a subframe to take the engine, weld it to the remaining front end and then replace the rear arch over the top, following the original lines as closely as possible. Not in this case. A completely different approach was taken here.
Firstly, the tubular spine of the scooter was removed, leaving the thin steel upper shell. As this was obviously not going to be able to take the weight of the engine, let alone the rider, a length of 1/8in thick, 2in x 1in box section steel was obtained and small triangular pieces removed in appropriate places to allow the steel to be bent to follow the scooter shape. These cuts were then welded shut again before being joined to the outer of the LD frame. This frame was going to have no flex in it at all. And probably weigh almost as much as the complete Lambretta would have originally!
The engine was then removed from the GTS frame. Sadly, Martin had never worked on an auto Vespa before and had no idea as to how to remove the engine. Luckily, he did own an angle grinder. With all the unnecessary bits (the chassis, in short) removed using this, it was time to work out how to actually fit it. I have this mental image of him laughing maniacally as he chopped this poor scooter, which never did him any harm, into a huge pile of tiny bits of rusty tin. Sorry, getting off topic there, but I suspect it’s not a million miles from the reality.


Just in case anyone has been up in arms about the whole idea of cutting an LD to pieces (I doubt anyone cares about the GTS, to be fair!), don’t worry. The base scooter was a bit of a shed to start with and it probably wasn’t worth trying to save. On the upside, the panels were going to have to be extensively reshaped to take the width of the engine, so a set of good ones wasn’t really needed. This was a bit unfortunate as Richard had decided that he wanted to keep the panels as original looking as possible, so some more cutting and welding followed to get them somewhere how they should look, and this in turn led to one of the nicest little touches on the scooter. The width of the engine meant that the floorboards couldn’t easily have supporting struts made to hold them in the traditional outrigger manner. The solution? Remove the rear running boards and weld them directly to the panels after incorporating a bar to give some protection to the exposed engine. Not only does this help keep the lines of the scooter, it’s one thing less to remove if access to the engine is needed, as each side comes away as one piece. Tidy.
The little mudguard that graces the rear wheel is another neat touch. Not obtrusive, it’s just big enough to protect the rider from whatever the road throws up without distracting from the classic lines of the scooter. Something I was surprised to be told is that the scooter comes in at eight inches longer than standard. It doesn’t look that much to me, the proportions of the classic frame being kept appropriate in my eyes, although I suspect a fair amount of it is down to that back wheel. Fortunately, the lump wasn’t too bad to squeeze in once the engine mount positions were located on the Lambretta; although it has led to the rear shocks being at an angle, I was surprised to find it actually worked, as they’re approaching the horizontal.
A downside of using the LD body was that the frame suddenly steps down in the area that the Vespa would have its fuel tank, meaning that there was the minor issue of having nowhere to hold the petrol it would require. A front mounted tank was the answer, hiding away behind the legshields in the area where you’d expect the radiator to sit. This also hides all the electrical gubbins needed to pump the fuel to where it’s needed, keeping some seriously ugly parts out of sight. Obviously, this meant that the radiator had to be moved; it ended up hidden away very subtly under the floorboards where, to be totally honest, I completely missed it at first viewing!
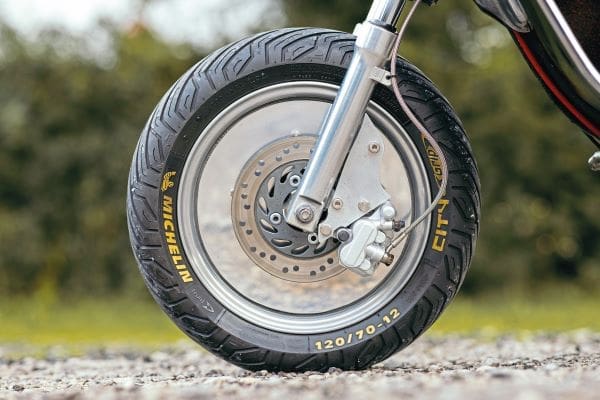
Up front, the forks are from another auto, this time a Gilera. A sensible move as there’s not really much chance that the standard LD forks could have been safely modified to handle the stopping power needed for the scooter. Between them sits what appears to be a billet wheel at first glance but given that the cost of this would have run to an eye-watering amount, the cheaper alternative of two aluminium discs bolted through the wheels gives the same solid looking effect without making the steering too heavy to be rideable. A one-off caliper carrier was also manufactured by the talented Mr Welsby.


Finishing touches
The steering has been deliberately kept clear of any surplus switchgear, emphasising the slightly dropped and pulled-back bars that feed through the original handlebar chassis, using the original Vespa components for brakes and throttle, with one-off aluminium covers being made to replace the original speedo and horn area. The switches themselves have been kept to an absolute minimum; literally two toggle switches, a big red engine start button and a more subtle one for the horn. Unusually, Richard made the decision to make a feature of the battery, siting it on the spine of the floorboards open to view, held in place by a simple studded belt arrangement. Hmm… Exposed electrical connections and northern weather. What could possibly go wrong there?
No prizes for guessing who did the paint either. Once again, Martin came through in spades and has laid down a stunning combination of a black base over which a red candy was applied. This was followed by a red flake and a black blowover coat to tone it down slightly. A few layers of clear coat followed. The overall effect is of a very deep shimmer which subtly changes shade depending on the light it catches. Unfortunately, you’ll have to take our word for that as the weather decided to be a bit miserable on the day of the photo shoot, but it really does ‘ping’, as the saying has it, on a sunny day.
Over the top the unusual graphic design was incorporated, which both draws attention to the lines of the scooter and complements the colour scheme. This was applied freehand by Phil Appleyard of Monster Forge custom paints, to whom Richard gave food and shelter while Phil applied the design at his house. From the sound of it, a few beers may have been involved as apparently, they had a damn good time while he was at it…
The design incorporated a handful of skulls to reflect something Richard collects, and these just break up the paint enough to make it more than just a set of graphics with a vague feel of 1970s wallpaper!


As the scooter was built to be ridden and not shown, something the owner feels very strongly about, a variety of seats were tried out for comfort and styling. While he was quite drawn towards a classic Snetterton-type minimalist affair, common sense and ageing bones suggested something with a bit of padding may be a better idea, and after a lot of thought the simple one that you see fitted was decided on and handmade, again by Martin. Personally, I think it again suits the overall style of the scooter; a racing seat would have taken away from the proportions of the machine.
I also feel that it emphasises something that struck me straight away when I saw a side-on shot of the scooter. If you imagine a petrol tank, something like a classic Mustang or Peanut type, in the gap behind the legshields, then all of a sudden the proportions take on a very motorcycle chopper look. Whether this is intentional or an unconscious bias from the custom bike builder who constructed it, I couldn’t say. But I do feel it’s one of the reasons this scooter hangs so well in its entirety: a purposeful look of a machine waiting to be ridden.
Which is handy really, isn’t it?

Owner details
Name: Richard Lavender.
Scooter club and home town: Chester/Flintshire.
What was your first scooter and how did you first become interested in them: A GP200 in 1984… from a teenager I was into scooters.
What was your first rally: Colwyn Bay 1984.
If you had to recommend one scooter part or item of riding kit what would it be: A bigger kit on most scooters.
What is your favourite scooter model: Lambretta SX200.

Scooter specifications
Name of scooter: No name.
Scooter model: Lambretta LD 1956/Vespa GTS 250 auto engine.
Time to build & by who: 12 months by Martin Welsby/Richard Lavender.
Engine specification
The donor scooter for all the running gear and electrics was a Vespa GTS 250.
We stripped it and binned all the bits we didn’t want or need
What’s it like to ride: FAST! Smooth and comfortable.
Frame specification
Paintwork & murals by: Martin Welsby. Artwork and pinstriping by Monster Forge (Phil Appleyard).
Seat by: Martin Welsby.
Any frame modifications? What & by whom: Many modifications to the frame, all inside was cut out to make room for the large Vespa engine. The whole spine had to be reinforced to keep the shape with heavy gauge steel.
Are there are any specialised parts: Many! Custom built petrol tank placed in the legshields, custom battery box in legshields, extended swingarm to push the back wheel out of the back. Panels had to be refabricated and cut, and rear floorboards are welded to the panels. LED headlight, custom-made handlebars, side mount numberplate and light, handmade leather seat.
Are there any other unique details we may have missed: The front end is from a Gilera with a custom-made billet front wheel and polished original covers, front disc brake caliper had to be fabricated. All the electrics were located to the butty box in the inside of the legshields; electric start buttons were fabricated.
What was the hardest part of the project: Getting the engine to fit into the frame. A lot of work went into this, finding a location for the petrol tank and battery box as there was no room left to fit inside the frame. Getting the shocks to still work and relocating them.
Do you have any advice or tech tips for anyone starting a project: Don’t do it!
In hindsight, is there anything you would have done differently: No, not really.
Is there anyone you wish to thank: Martin Welsby. I had the vision and the design, I drew it up but Martin made it come to life and got me a running painted scooter with the unique back end I wanted. He managed to get the engine to fit and still made it look like a scooter. Martin has built several chopper motorcycles for me over the years and hates scooters! (So he said – lol.) Phil Appleyard: Phil came to stay with me for three days and did all the pinstriping and graphics. I am massively into skulls and I don’t like traditional pinstriping so I designed the style and asked him to incorporate the skulls. He did it all freehand and I fed and watered him for three days and had a blast…