When working on the Lambretta engine the correct tools are a must. It makes the job easier and prevents damage to components.
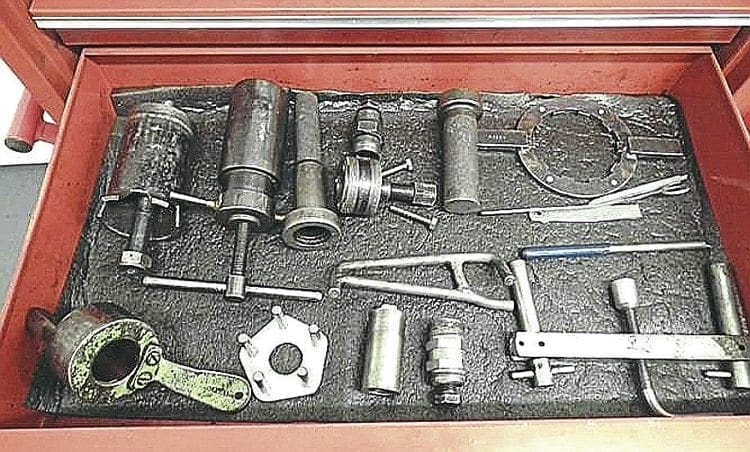
Disassembling or reassembling a Lambretta engine requires certain tools to make it possible. By using alternatives or bodges it will more than likely end in failure and in the worst case scenario damage the part you are working on. Innocenti produced lots of different workshop tools, each to carry out a specific purpose. From time to time they come up for sale and are well worth buying not only because they were made well but also as they fit perfectly. Even so, there are not enough to go around so this means that aftermarket ones are the only option. Thankfully, there are some good manufacturers producing them, and are a worthwhile purchase if you want to work on your Lambretta engine. So what are the most important and why?
1: Clutch holding tool

The idea of the clutch holding tool is to keep the clutch spider fixed while tightening or undoing the 24mm nut that secures it in place. Because of the free movement of the nut on the end of the gear cluster, unless the spider is locked in a solid position it will spin around. By placing the clutch holding tool in all of the tangs on the spider there will be no movement from any of them. The alternative of placing a screwdriver or bar between two opposing tangs will result in them flexing once a force is exerted on the nut, causing them to bend. This will damage the spider, not allowing free movement of the clutch plates, and as they will be almost impossible to get back in line it will need replacing.
Enjoy more Scootering Magazine reading every month.
Click here to subscribe & save.
It is possible to make one by riveting a set of clutch steels together and welding a bar on opposing sides as the stop. In doing so you must get all four plates perfectly in line before riveting together otherwise they will not fit in the spider correctly.
2: Clutch compressor
The clutch compressor does exactly that, by pushing the clutch bell and springs all the way down. This allows the clutch plates to drop into position so the retaining circlip can be fitted. It also works in reverse, taking the pressure off the circlip, allowing its removal, while at the same time stopping the clutch from exploding. There is no real alternative to compressing the clutch so the right tool is a must.
There are two types for sale: one which has two fixings and one which has four. As the tool uses the casing studs to secure it the one with four fixing points is the better option. If using the one with two make sure the side case stud threads are perfect as when the tool is under full compression the force of the springs can rip out the thread if it is weak.
3: Flywheel puller
When it comes to removing the flywheel then a puller is the only option. With the tapper on the flywheel located on the crankshaft, there is no other way of moving it. Before screwing the puller into the flywheel always clean the thread as much as possible beforehand.
As the thread is such a fine pitch any dirt in it stops the puller from going in as far as it should. Sometimes with a tight-fitting flywheel thread if the puller is not in far enough in then it will strip the threads on the puller as pressure is applied, damaging the tool and stopping it from being used again.
Again, there are two types available — a single-thread or double-thread type. The single one is for Italian flywheels whereas the double has the option for Spanish ones as well. Even though the Spanish option is rarely used you never know when an engine will have one fitted. The double-thread type is slightly more robust and exits further out from the flywheel puller making it easier to use so is the best option when purchasing one.
4: Flywheel holding tool
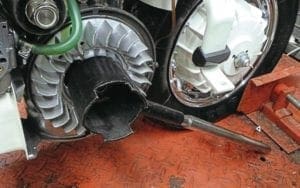
Loosening or securing the flywheel nut will require the flywheel to be in a fixed position to stop it from spinning around. This is done by using a holding tool which will keep the flywheel locked no matter how much force is used. The alternative here is one that’s tempting but shouldn’t ever be undertaken. It is possible to wedge a spanner or screwdriver between a fin and the top fixing in the mag housing.
Though it may be just adequate enough when undoing the flywheel nut chances are when tightening it up the fin will snap off. It is an easily made tool and there are plenty of good examples available on the market.
5: Conrod holding tool
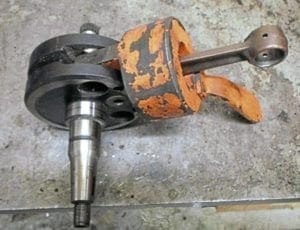
The conrod holding tool is a vital piece of equipment as it’s required to stop the crankshaft turning when the sprocket bolt is tightened or loosened. Using the conrod holding tool is the only way to do this without causing any damage to the crank.
It has been known to put a round bar through the small end and pack the walls of the crankcase mouth with two pieces of wood either side to hold it. Not only could the bar damage the surface where the small end bearing sits, if one of the pieces of wood slips while under tension it can potentially bend the con rod. Either way, both will result in expensive damage to the crankshaft so only a proper holding tool should be used.
6: Gearbox endplate removal tool
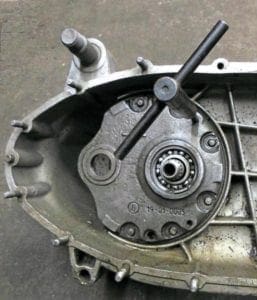
When removing the gearbox endplate the 6mm thread removal tool is the best option. Two are used in unison and by turning them alternately lift the end plate off the Christmas tree and layshaft. It is possible to use two long 6mm bolts instead but a ratchet will need to be used one at a time making removal a much more lengthy process.
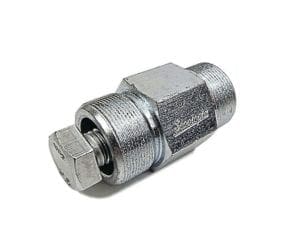
7: Rear hub Puller
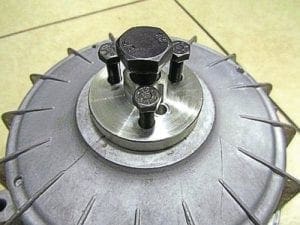
The rear hub puller has just one job: to remove the rear hub. The 27mm retaining nut holds the hub in position but it’s the tapered cone that locks it securely in place. So even when the nut is undone it will require a puller to remove the hub from the layshaft. This is done by inserting three 11mm bolts into the extraction holes on the hub itself. The centre bolt of the tool is then tightened onto the Layshaft thus pulling the hub off.
The most important thing is to make sure the three bolts that secure into the hub are wound in an equal length to each other. If they are not then as the centre bolt is tightened there can be a tendency for the circular plate to lift off centre and not allow enough force to remove the hub. This will result in one or all of the 11mm bolts bending with the pressure applied to them, meaning they will need to be replaced.
Because of all the water and dirt that gets into the threads on the hub, it may be necessary to clean them out to make sure the bolts screw in easily and down the whole length of the thread.
By firstly running a 7mm tap down the threads it will clear them out and using a small amount of grease on the bolts they should go in with ease. When the centre bolt is tight you can tap the head of the bolt slightly to break the seal on the tapper. If the hub is still stubborn in removal then tighten the centre bolt slightly more and repeat the process of tapping it until finally it comes off.
Never use heavy force though as you may damage the hub.
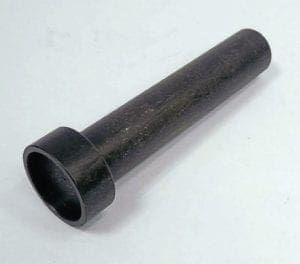
8: Magside bearing sleeve removal tool
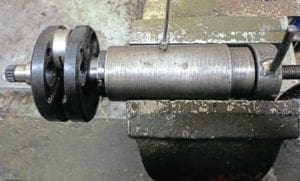
The magside bearing sleeve removal tool is an absolute necessity and there is no real alternative. Its job is to remove the collar that is placed on the flywheel side of the crankshaft when the magside bearing is being replaced. Though the collar is only held in place by an interference fit it is impossible to remove it in any other way than by pulling it off.
The tool works by its three jaws locking over the lip of the end of the collar before been tightened and secured in place. The centre bolt is then wound on to the crankshaft which in turn pulls the collar off the end of the crank. Great care must be taken to ensure the jaws are fully over the edge of the lip of the collar as it is only around 1mm deep. If the jaws are not securely in place they will slip off the collar and over time the edge on the jaws will start to wear and round off.
The only alternative to removing the collar is it to grind along its surface until it is thin enough and cracks. The tension is let off and the collar will then fall off.
The problem with doing this is the oil seal lip sits right next to it and if you catch it even slightly with the grinding disc then it won’t seal rendering the crank useless. You will also need to remove the crankshaft completely to try this tricky process, and it is not recommended.
The other benefit of using the extraction tool means the crankshaft doesn’t need to be removed from the engine to carry out the procedure. The only problem with this tool is getting hold of one.
Innocenti made them very robustly, but after many years of use, a lot of them are worn out on the jaw surfaces. It’s a complicated tool to produce and not many aftermarket ones have been made available over the years. It may be the case you will need to take it to a shop to get it removed, but as it is the crankshaft that will be damaged if removal goes wrong it is not worth taking the risk.
9: Bearing drifts
The bearing drift is used to either insert or remove a bearing into the casings. When it comes to removal then it’s a case of hitting the bearing with a good amount of force to remove it. The bearing is no good anymore so it doesn’t matter if it’s damaged during removal. When it comes to inserting a bearing though greater care should be taken. Heat up the case first before inserting the bearing as far as you can. It may be the bearing goes all the way into its recess first time, but if it doesn’t go all the way in then a gentle tap with the correct drift will secure it into position. Sometimes there is a tendency to perhaps use a socket out of a socket set. Not only will it damage the socket, they don’t always exactly fit so you may damage the bearing as well.
Always use the correct size drift so that it sits on the outer edge of the bearing. There are several different size bearings for the Lambretta so make sure you have a set of the correct size drifts. There are plenty available to buy and at an affordable price.
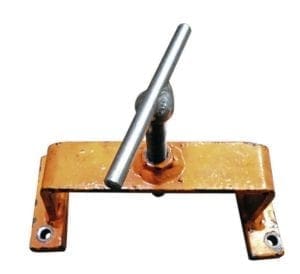
10: Wheel stand
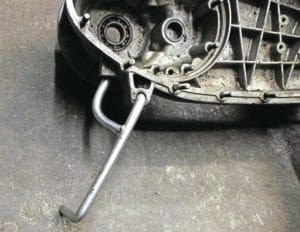
Some may question why a wheel stand is included in this article. However, though the tool may be crude, it does the job perfectly. When Innocenti designed the series one engine the idea was to make the fitting of spare wheel easy and on the roadside. By putting a jack point at the rear of the casing and using a simple-to-fit but compact stand the problem was solved. The engine stand can be used to equally good effect on the workbench.
If the gearbox or layshaft needs servicing then you will have to remove the rear hub. The only way of keeping the engine in position is by using the wheel stand. The whole area can be worked on easily without the need for engine removal. The only other alternative is to place something underneath the rear of the frame. Not only can this damage the paintwork if it moves or slips, it’s also in the way where you are working.
There are plenty of original wheel stands lying around so availability isn’t a problem. There are many aftermarket ones also available, some with an added strengthening bar, making the engine even more stable while working on it when the rear wheel is removed. This tool is probably one of the cheapest to buy but one that should be in any garage or Lambretta workshop.
11: Brake shoe trimmer
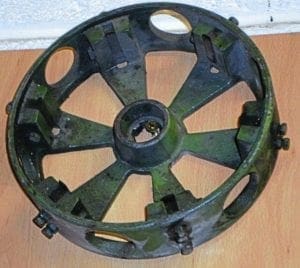
The Lambretta break shoe trimmer can be a great help in getting the rear brake to work properly. The Lambretta has always been associated with a poor back brake.
More often than not it is down to the shoe surface not being even enough. When the rear hub is removed it is possible to see the high spots on the surface of each shoe. By fitting a brake shoe trimmer this can remove the high spots and make the brake more efficient as all the surface of the shoe can now make contact with the lining on the hub.
It works by placing the trimmer on the splines of the layshaft. With the engine fired up and then put into first gear the trimmer will start to turn and spin faster as you give the engine a bit of throttle.
By pressing down on the brake pedal the shoes will make contact with the trimmer and reprofile the shoes. The problem with this tool is only Innocenti made them and they are hard to come by. If you can gain access to one then it’s worth using it to make the rear brake more efficient and help with its stopping power.
Summary
Though there are many tools that can benefit working on a Lambretta engine to make the job more easy the ones listed are essential. Not only do they prevent damaging a component because it was forced or hit with something it shouldn’t have been, but it’s just as important to protect the casing. Many are readily available to buy and are good quality, whereas some will have to be loaned or your engine taken to a shop to get use of one. The most important thing to remember is when the Lambretta engine was designed, just like any other there is a way of fitting a component and a way of removing it. Tools were made to do these jobs and therefore should be used at all times when carrying them out.
Words & Photographs: Stu Owen
Thanks to Scootopia and Lambrettaupgrades.co.uk for their help producing this article.