Our ‘painting by numbers’ series is here to guide readers through the process of painting a scooter. Parts 1-5 (see back issue editions May-September) have covered prep, primer, paint and pearls and flake. This month we move on to candy…
What is candy paint?
Typically it is a dye suspended in a clear carrier which is known as intercoat clear, it is basically everything that is in paint without the pigment (colour). This goes for both solvent based (the most popular) and water based which is relatively new.
Enjoy more Scootering reading in the monthly magazine.
Click here to subscribe & save.
There are pseudo candies out there which are pigment based using extremely fine ground pigments but be careful as they can bury the underlying effect if you’re too heavy-handed so make sure you purchase the right one for the job.
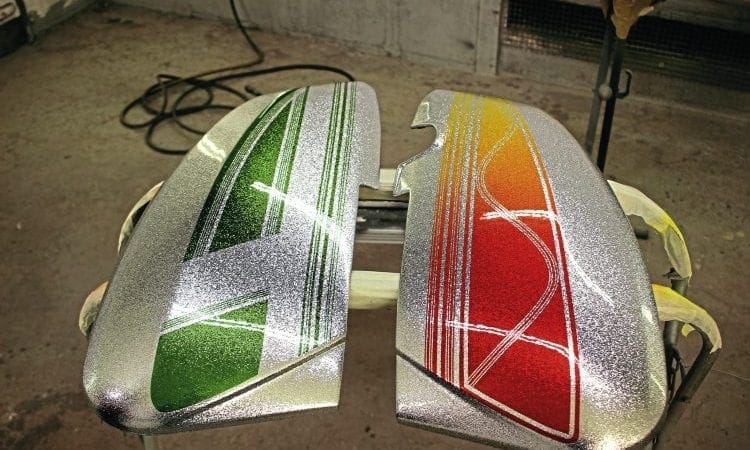
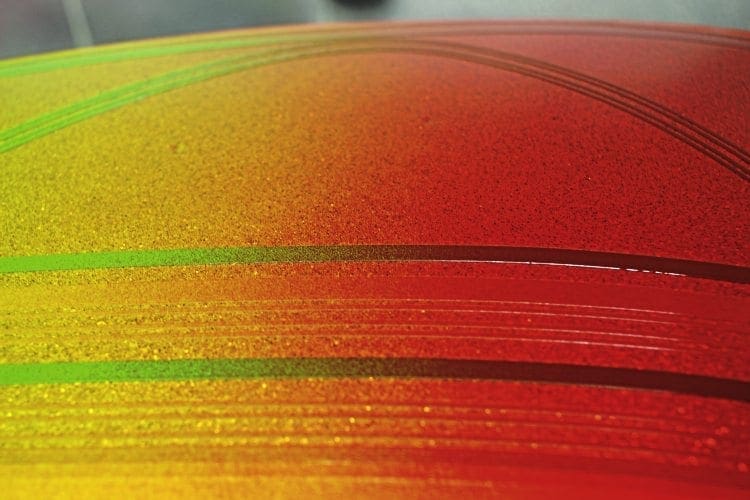
Candies are fantastic at blending as you can see the photo of the red fading through orange to the yellow while still seeing the metal flake through it. You can use the primary colour principles to get some fantastic colours and combinations of colours.
Because candies are dye based it means that you can see through them, making them ideal to colour the effect or design that is underneath. In this article we put the candy directly over the metal flake, but it could have just as easily been over a marble effect, ice effect or even a black and white mural.
Candy is typically supplied in two forms
Base Coat which is ready mixed, just add thinner and you’re good to go, and concentrated which you add to either a clear binder (intercoat clear) or directly to your clear coat. Be careful — if you’re mixing your own the typical maximum percentage of concentrate to your carrier is 10%. Any more can cause bleeding into your other coats.
Caution
Candy, because it is a dye, will fade and different colours can fade at different speeds so please bear this in mind when storing your scooter.
Consider
There are certain aspects of candy paints which you need to consider. The final shade of colour you end up with is purely dependent upon how many coats you apply — the more coats the darker it will get. So please do a test panel and record everything — the gun, the air pressure, the speed, the distance, the ‘pass overlap’.
Application
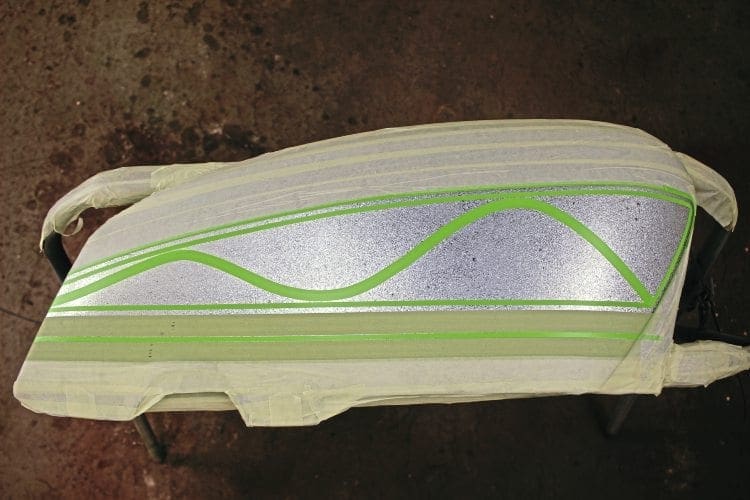
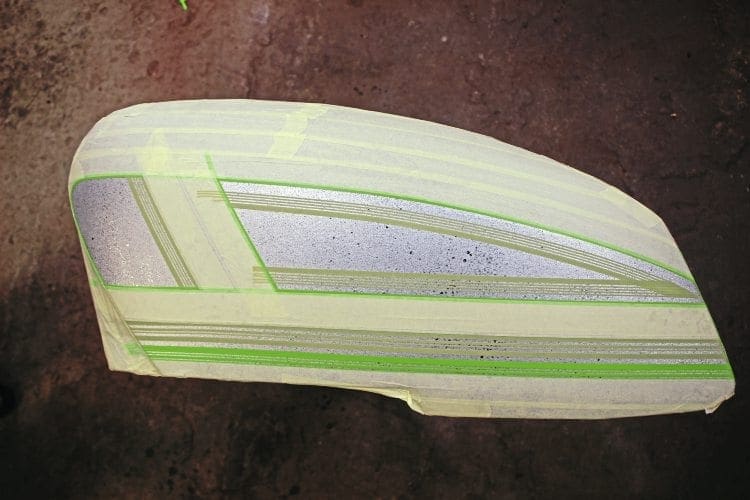
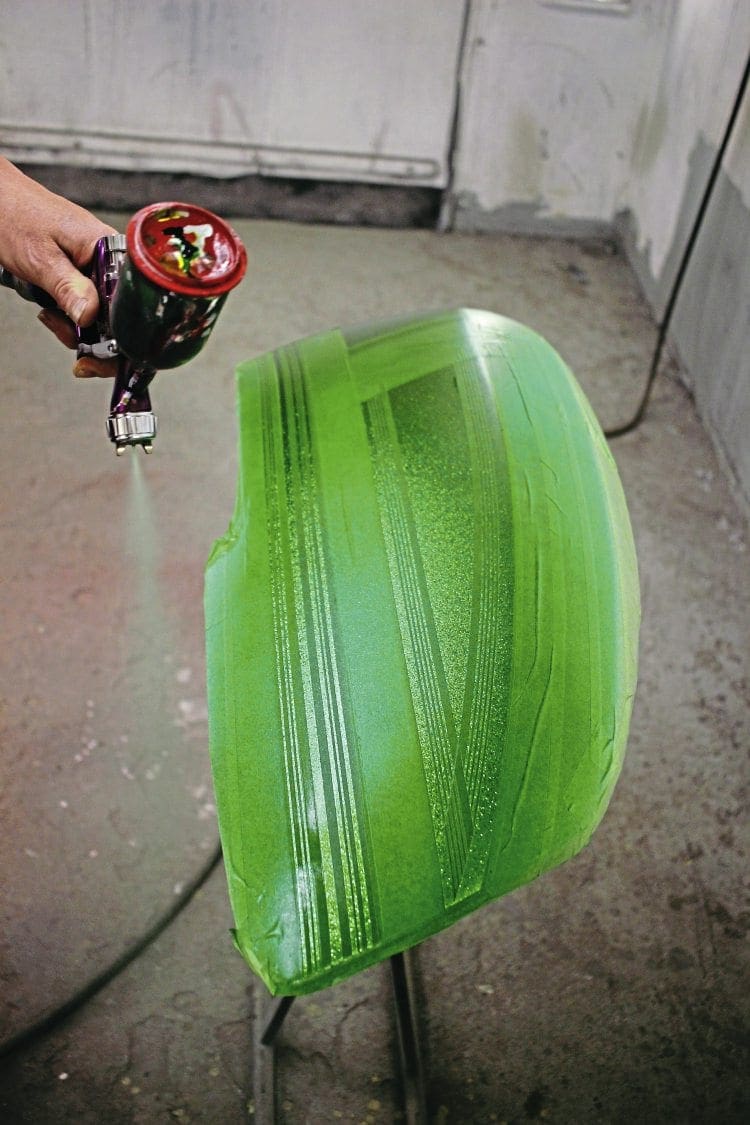
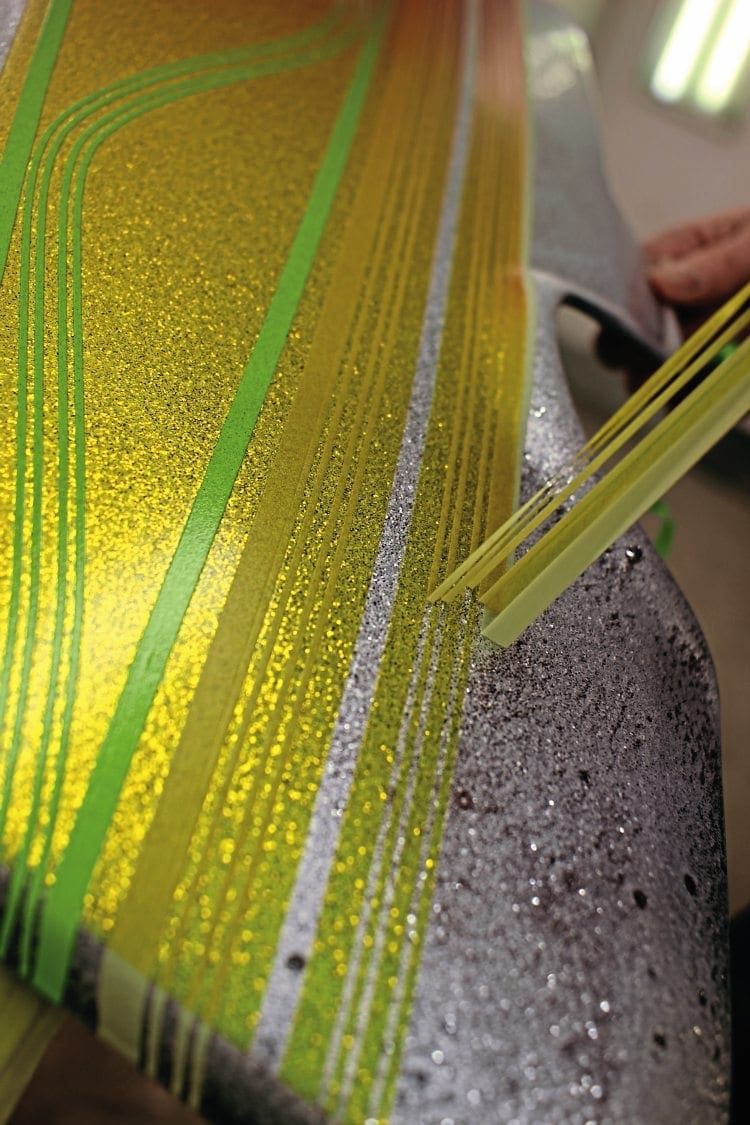
Last month we went through the basics of taking a prepped set of side panels and applying a black base coat, before using the dry flake application method to get a good coverage of silver flake and clear coat. Those same panels, having had sufficient clear coats to bury the flake, have now been flatted off with wet and dry, thoroughly cleaned and then masked up in anticipation of applying candy to each one. Del from Custom Paint Shop masked each panel differently, in order to show two different types of application, the first with a red to yellow fade, and the second with a straight green coverage. This also threw up an opportunity to demonstrate the use of pre-cut pinstripe tape, which makes the masking stage so much easier.
Once masked up, the panel was given a final clean, to ensure no debris was present, before application commenced.

Kindly, Darlington base paint sprayer Graeme Wigley took us through what seemed to be an amazingly simple procedure for application.
Red to yellow fade
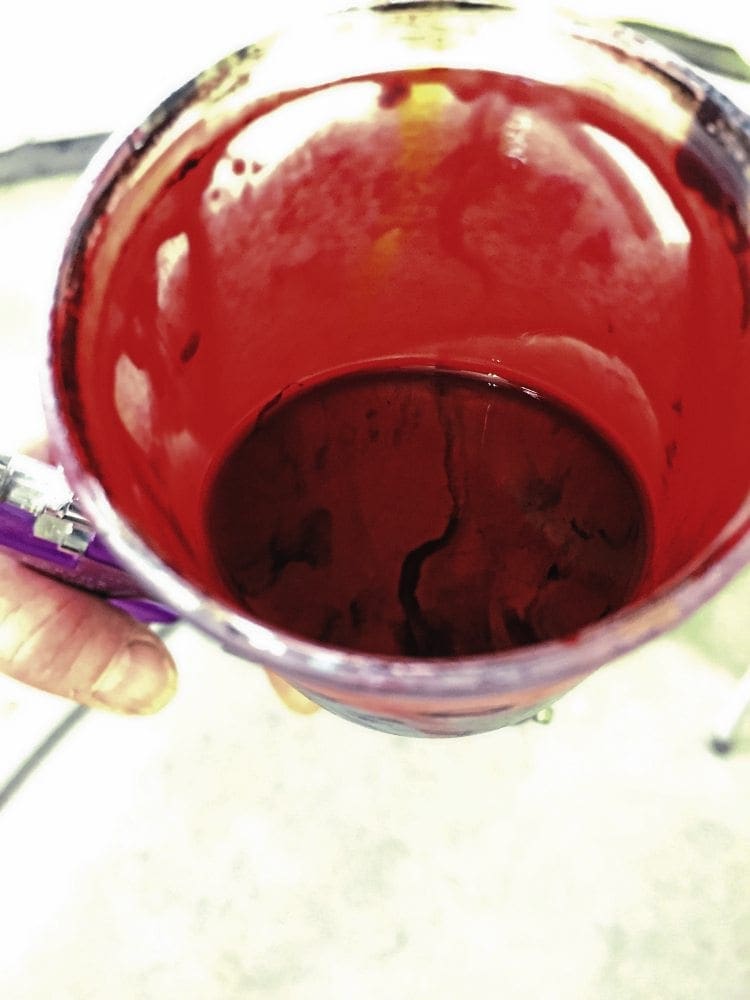
With the spray booth doors closed, extractor fans on, the panels pre-masked and having just been given a final wipe down, all that remained was for Graeme to run the candy paint through a strainer, to ensure 100% that the paint was completely clean and ready for his gravity fed gun.
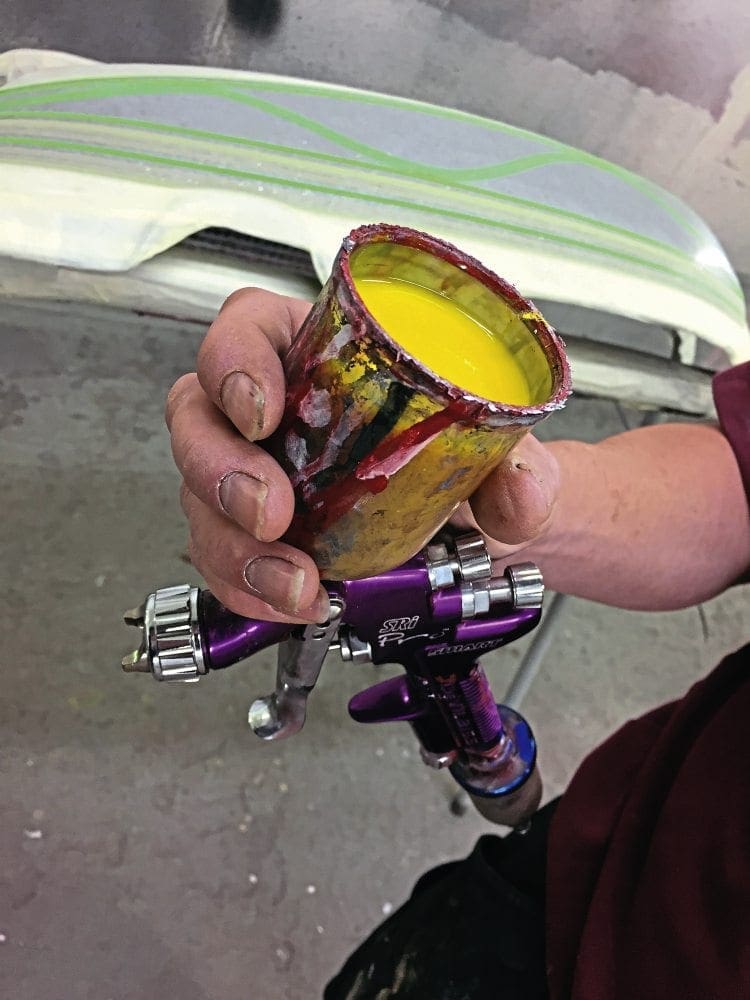
Once the yellow paint was in the gun, Graeme applied five very light but even dust coats, in order to build up the colour. The coats were so light, that they didn’t seem to cover the pinstripe tape at all, but sat beautifully with the flake coats beneath.
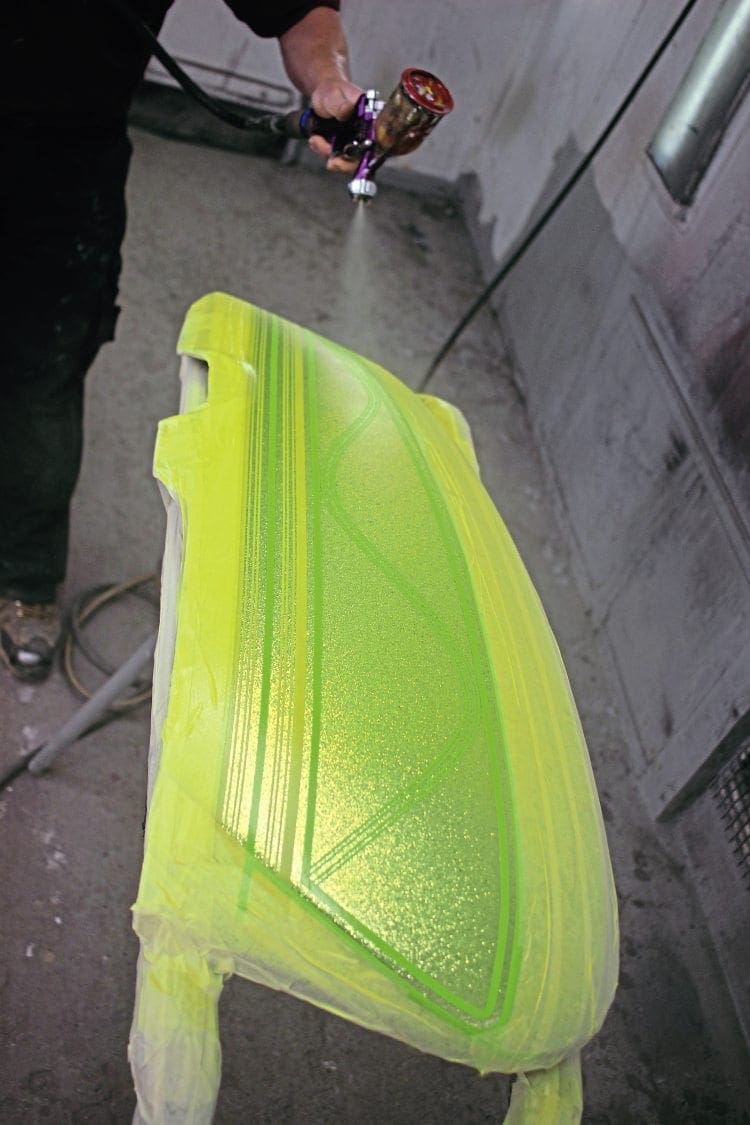
Each dust coat of candy providing a darker and more thorough coverage, and with Graeme using (at a safe distance) a heat gun between coats, just wafting it in the direction of the panel, in order to help each coat dry. Once sufficient yellow coverage was complete, Graeme got the gun ready with a pot of red candy and then visually defined a line on the panel where he wanted the fade to take place.
He then applied the first few dust coats of red with the gun angled straight down, therefore the visual separation between red and yellow was starker.
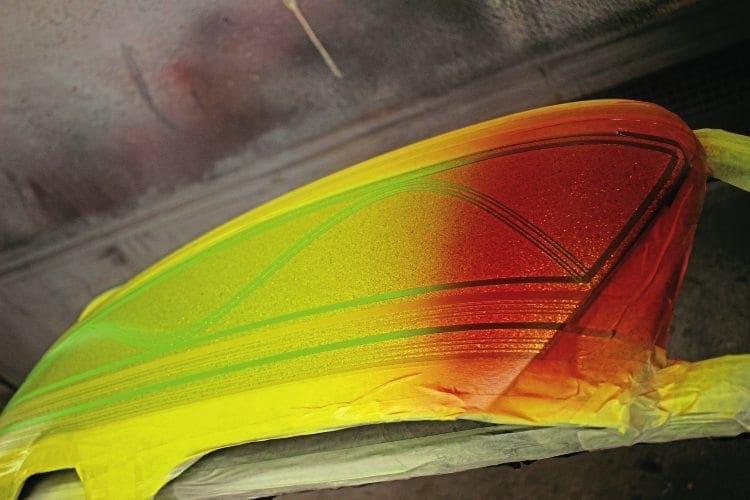
Once he was happy with the dividing point, he angled the gun so that as he built up the coverage of red, it also blew a mist down the panel, thus creating a mid-section with an orange tint, as the red and yellow merged.
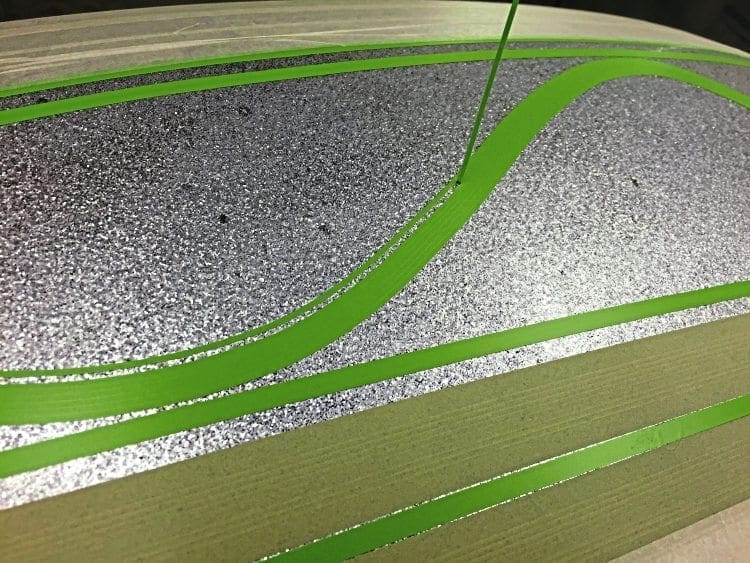
Green with envy
Once the red to yellow fade was complete, that the panel was set aside and the green candy paint was prepped for the gun. This panel was straightforward building up of even dust coats, with the usual 75% overlap on each pass, until even coverage was achieved. Every coat took the candy a stage darker, until after five coats of perfectly even coverage it was just as Graeme wanted.
De-mask and clear coat
After allowing the candy to dry, the simple yet painstaking procedure of de-masking and de-taping the panels took place. Graeme was very careful to bring the tape off very slowly and carefully, so as to keep the lines nice and clean.

Graeme pointed out that the lighter dust coats had achieved good coverage and colour, but prevented problematic ‘thick areas’ building up over the tape, which can then be a nightmare to remove. All but one of the lines came out nice and clean. On the one area where the line had a little ‘paint drag’, Graeme simply cleaned up the loose candy with a scalpel blade and all looked well.
All that remained then, was for the clear coat, of which Graeme applied four or five coats. This by far is my favourite bit. Watching a panel which has been flatted get re-coated with lacquer is astonishing. The wet application just brings the whole panel, the flatted flake, and the freshly applied candy bursting into life.
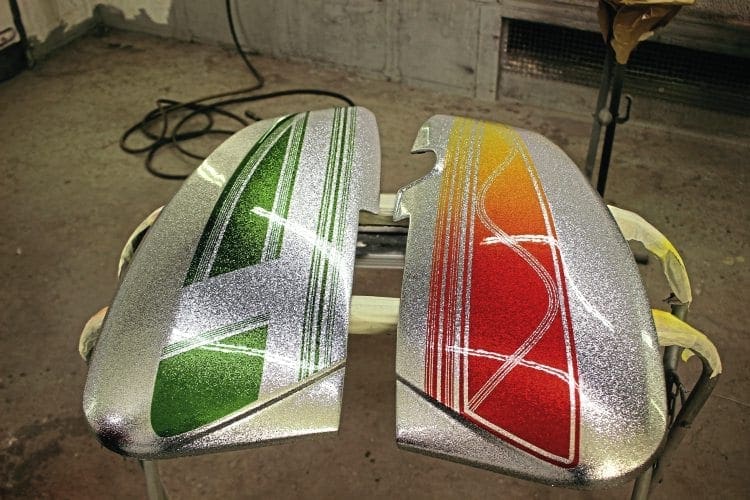
The end result, especially given that this was a simple ‘quick tutorial’ panel and not a show panel for a customer, was brilliant. Graeme finished the clear coating with several more layers, before leaving to dry. Once cured, the panel will get the final, flat and polish and will be used as a display item.
Words: Del & Dan
Photographs: Dan
Thanks to Del @ Custom Paintshop and Graeme Wigley @ Smarter Car Cosmetics for their help with this article.
This article was taken from the October 2016 edition of Scootering, back issues available here: www.classicmagazines.co.uk/issue/SCO/year/2016

Enjoy more Scootering reading in the monthly magazine. Click here to subscribe.
Scooter Trader